So, you’ve just unboxed your shiny new countertop ice maker. The promise of an endless supply of fresh ice for your cocktails, smoothies, and iced coffees is finally within reach. But before you dive into a world of perfectly chilled beverages, figuring out How To Use A Countertop Ice Maker for the first time can feel a bit like a puzzle. Don’t worry, you’ve come to the right place. We at Ice Maker World live and breathe this technology, and this comprehensive guide will turn you from a novice into an ice-making pro in no time.
First, What Kind of Ice Maker Are We Talking About?
While the world of ice machines is vast, they generally fall into a few key categories. Understanding where your new gadget fits in helps you appreciate its design and function.
- Portable Countertop Ice Makers: This is likely what you have. These compact, plug-and-play units are the heroes of home bars, RVs, and small offices. They don’t require a dedicated water line and are designed for convenience.
- Under-Counter Ice Makers: These are built-in appliances that fit seamlessly into your kitchen or bar cabinetry. They often require professional installation with a dedicated water line and drain.
- Commercial Ice Machines: These are the heavy-duty powerhouses you see in restaurants and hotels, capable of producing hundreds of pounds of ice per day.
This guide focuses squarely on the most popular choice for home use: the portable countertop model.
How Does a Countertop Ice Maker Actually Work?
Ever wondered about the magic happening inside that little box? It’s actually a fascinating and straightforward process. Think of it as an automated, super-fast mini-freezer.
When you pour water into the reservoir, a pump lifts it into a small tray. A set of metal prongs, which get incredibly cold, are then lowered into the water. Ice begins to form around these “freezing fingers.” Once the ice cubes reach the desired thickness (a process that usually takes 6-13 minutes), the machine briefly warms the prongs, causing the ice to slide off and into the collection basket. A sensor then detects the ice drop, and the cycle starts all over again. It’s a beautifully simple system designed for speed and efficiency.
Key Features to Know on Your Machine
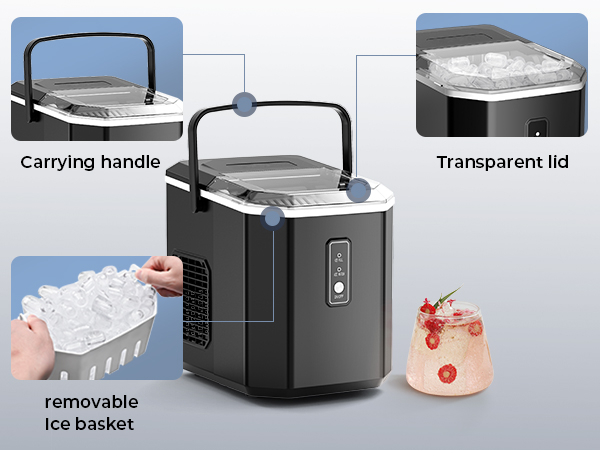
Before we get to the step-by-step instructions, familiarize yourself with the main parts of your ice maker. Most models will have:
- Water Reservoir: This is where you pour the water. It will have a “Max Fill” line—pay close attention to it!
- Ice Basket: A removable basket where the finished ice cubes are collected.
- Control Panel: Usually features simple buttons for power, and sometimes for selecting the ice cube size (Small or Large).
- Indicator Lights: These will alert you when you need to “Add Water” or when the “Ice Full” basket needs to be emptied.
- Ice Scoop: Your trusty tool for serving up fresh ice.
- Drain Plug: Located on the bottom or back, this is for emptying the machine completely for cleaning or storage.
|
Our Picks for the Best ice maker in 2026
As an Amazon Associate, we earn from qualifying purchases.
|
||
| Num | Product | Action |
|---|---|---|
| 1 | Frigidaire 26 Lbs per Day Portable Compact Maker, Ice Making Machine, Black Stainless, Medium |

|
| 2 | EUHOMY Nugget Ice Maker Countertop with Handle, Ready in 6 Mins, 34lbs Per Day, Removable Top Cover, Auto-Cleaning, Portable Sonic Ice Maker with Basket and Scoop, for Home/Party/RV/Camping (Black) |
|
| 3 | EUHOMY Countertop Ice Maker Machine with Handle, 26lbs in 24Hrs, 9 Ice Cubes Ready in 6 Mins, Auto-Cleaning Portable Ice Maker with Basket and Scoop, for Home/Kitchen/Camping/RV. (Black) |
|
| 4 | EUHOMY Nugget Ice Makers Countertop, Pebble Ice Maker Machine with 35lbs/24H Soft Ice, Self-Cleaning Sonic Ice Maker with Ice Scoop&Basket, Pellet Ice Maker for Home/Kitchen/Office(Stainless Steels) |
|
| 5 | Nugget Countertop Ice Maker with Soft Chewable Pellet Ice, Pebble Portable Ice Machine, 34lbs Per Day, Self-Cleaning, Sonic Ice, One-Click Operation, for Kitchen,Office Stainless Steel Black |
|
| 6 | FRIGIDAIRE EFIC189-Silver Compact Ice Maker, 26 lb per Day, Silver |
|
| 7 | Silonn Nugget Ice Maker Countertop, Pebble Ice Maker with Soft Chewable Ice, One-Click Operation Ice Machine with Self-Cleaning, 33lbs/24H for Home,Kitchen,Office |
|
| 8 | ZAFRO Countertop Ice Maker, 26.5Lbs/24H, 9 Bullet Cubes in 6 Mins, Self-Cleaning Portable Ice Machine with 2 Ice Sizes (S/L), Quiet Compact Design, Double Handles, for Home, Party, RV, Camping, Green |
|
| 9 | FRIGIDAIRE EFIC101-BLACK Ice Maker Machine for Countertop, 26 lbs, Adjustable Ice Cube Size, Portable Ice Cube Maker for Home/Kitchen/Office/Bar- Black |
|
| 10 | Ice Maker Countertop, 9 Cubes Ready in 6 Mins, 26 lbs per Day, Ice Machine with 2 Ice Sizes and Self-Cleaning, Portable Ice Maker with Handle for Home, Kitchen, Camping, RV, Office, Black |
|
How to Use a Countertop Ice Maker: A Step-by-Step Guide
Alright, let’s get down to business. Following these steps will ensure your machine runs perfectly from the very first batch.
- Find the Perfect Spot: Unbox your ice maker and place it on a stable, level, and water-resistant countertop. Here’s a pro-tip: leave at least 5-6 inches of clearance around all sides, especially the back and sides where the fan vents are located. Proper ventilation is crucial to prevent overheating and ensure efficient operation.
- Clean It Before You Use It: This step is non-negotiable. Your machine has been sitting in a box since it left the factory. To get rid of any dust or manufacturing residues, you need to give it a quick clean.
- Remove the ice basket and wash it with warm, soapy water. Rinse thoroughly.
- Wipe down the inside of the machine with a soft cloth, using a diluted solution of water and vinegar or a specialized ice machine cleaner.
- Use the drain plug to empty the cleaning solution, then rinse the interior with clean water and drain it again.
- Fill the Water Reservoir: Using a pitcher, pour clean water into the reservoir up to the “Max Fill” line. Do not overfill it! This can interfere with the sensors and cause issues. For the best-tasting, clearest ice, we highly recommend using filtered or bottled spring water. Hard tap water can lead to cloudy ice and mineral buildup over time.
- Plug It In and Power On: Once filled, plug the machine into a grounded electrical outlet. Press the “Power” button on the control panel. If your model has an ice size selection, now is the time to choose it. For the first run, “Small” is often a good choice as it freezes faster.
- Run the First Cycle (and Toss It): Let the machine run a full cycle. It’s generally recommended to discard the first one or two batches of ice. This helps flush out any remaining residue from the cleaning process, ensuring your subsequent batches are pure and taste-free.
- Enjoy Your Ice! That’s it! After the first cycle, your machine will continue to produce a fresh batch of ice every 6 to 15 minutes, depending on the model and ambient temperature. Keep an eye on the indicator lights to know when to add more water or empty the basket.
A Word from the Experts: David Chen, a seasoned appliance technician with over 15 years of experience, always tells his clients: “The single best thing you can do for your countertop ice maker is to use good quality water. Filtered water not only makes better ice, but it dramatically reduces the scale and mineral buildup that can shorten the life of the machine. It’s a simple step that pays off big time.”
Pro-Tips for Perfect Ice and a Happy Machine
You now know how to use a countertop ice maker, but these tips will take your ice game to the next level.
- Empty the Basket Regularly: The ice basket is not a freezer. The ice will slowly melt over time. For the freshest ice, empty the basket into your freezer’s ice bin every few hours.
- Pre-Chill Your Water: For slightly faster ice production, start with cold water from the fridge.
- Keep it Clean: To prevent mold and mildew, perform the cleaning routine described in Step 2 at least once a month, or more frequently if you use it daily.
- Descale Every 3-6 Months: If you have hard water, you’ll need to descale the machine to remove mineral buildup. Run a cycle with a water-and-vinegar solution (or a commercial descaling solution), followed by several rinse cycles with clean water.
Common Problems and Quick Fixes
What happens when things don’t go as planned? Here are some common hiccups and how to solve them.
Why is my ice maker not making ice?
This is often caused by a few simple issues. First, check if there’s enough water in the reservoir and if the “Add Water” light is on. Second, ensure the machine has proper ventilation and isn’t overheating. Finally, if it’s brand new, make sure you’ve let it sit upright for at least an hour before plugging it in to allow the coolant to settle.
Why are my ice cubes small or melting quickly?
If your ice cubes seem small, ensure you’ve selected the “Large” size setting if available. If they are melting fast in the basket, that’s normal. As mentioned, the collection basket is insulated but not refrigerated. Transfer ice to your freezer for long-term storage.
What do the blinking lights on my ice maker mean?
Blinking lights usually signal it’s time for you to do something. A blinking “Add Water” light means the reservoir is empty. A solid or blinking “Ice Full” light means the basket is full and needs to be emptied so the machine can make more ice.
Frequently Asked Questions (FAQ)
How long does a countertop ice maker take to make the first batch of ice?
Most countertop ice makers will produce their first batch of ice in about 6 to 13 minutes after you power it on. Subsequent batches are often a bit faster as the internal components are already cold.
Can I leave my portable ice maker on all the time?
Yes, you can. These machines are designed to run continuously. They have sensors that will automatically stop production when the ice basket is full and restart once you remove some ice. However, for energy savings and longevity, it’s a good practice to turn it off if you won’t be using it for more than a day.
Can I use tap water in my countertop ice maker?
You can, but filtered or bottled water is highly recommended. Tap water, especially hard water, contains minerals that can cause cloudy ice, affect the taste, and lead to limescale buildup inside the machine, requiring more frequent cleaning and descaling.
How often should I clean my portable ice maker?
For optimal performance and hygiene, you should give your machine a full cleaning at least once a month. If you use it daily or have hard water, cleaning it every two weeks is an even better practice to prevent any mold or mineral deposits.
Why do I need to let the ice maker sit upright before using it?
The ice maker contains a refrigerant coolant, similar to a refrigerator. During shipping, the unit can be tilted, causing the coolant to move around. Letting it sit upright for at least one hour (or as recommended by the manufacturer) allows the coolant to settle properly in the compressor, ensuring the machine will function correctly and not get damaged.
The Final Scoop
Mastering how to use a countertop ice maker is incredibly simple and rewarding. With just a few easy steps—proper placement, a quick initial clean, and using good quality water—you unlock the convenience of having fresh ice on demand. This handy appliance is more than just a gadget; it’s a lifestyle upgrade for anyone who loves a perfectly chilled drink. So go ahead, follow this guide, and start enjoying the endless cool possibilities your new ice maker has to offer.